
Next.js + Supabase 프로젝트 - (5) : Github 연결, vercel 배포, CI/CD 구현하기
이 글은 Next.js + Supabase 프로젝트를 GitHub와 연동하고 Vercel을 이용해 무료로 웹사이트를 배포하는 방법을 안내합니다. 먼저 로컬 프로젝트를 GitHub 저장소에 git init, add, commit, push 절차를 통해 올리는 과정을 설명합니다. 이어 Vercel에서 GitHub 앱 확장을 설치한 뒤, 해당 저장소를 연동하고 프로젝트를 배포하는 과정을 단계별로 안내합니다. 마지막으로, GitHub에 코드 변경을 푸시하면 자동으로 배포되는 CI/CD 설정도 간단히 확인할 수 있습니다.
저는 프로젝트 개발을 진행하면서 사이트로 배포도 무료로 해보려고 합니다.
일단 무료로 사이트를 띄우는 방법으로 Vercel 을 택하겠습니다.
주요 내용
1. 작업중인 프로젝트 Github 에 올리기
2. 프로젝트 vercel 로 배포하기
3. Github 코드 푸쉬로 Vercel 에 CI/CD 구현하기
1. 진행중인 프로젝트 Github 에 올리기
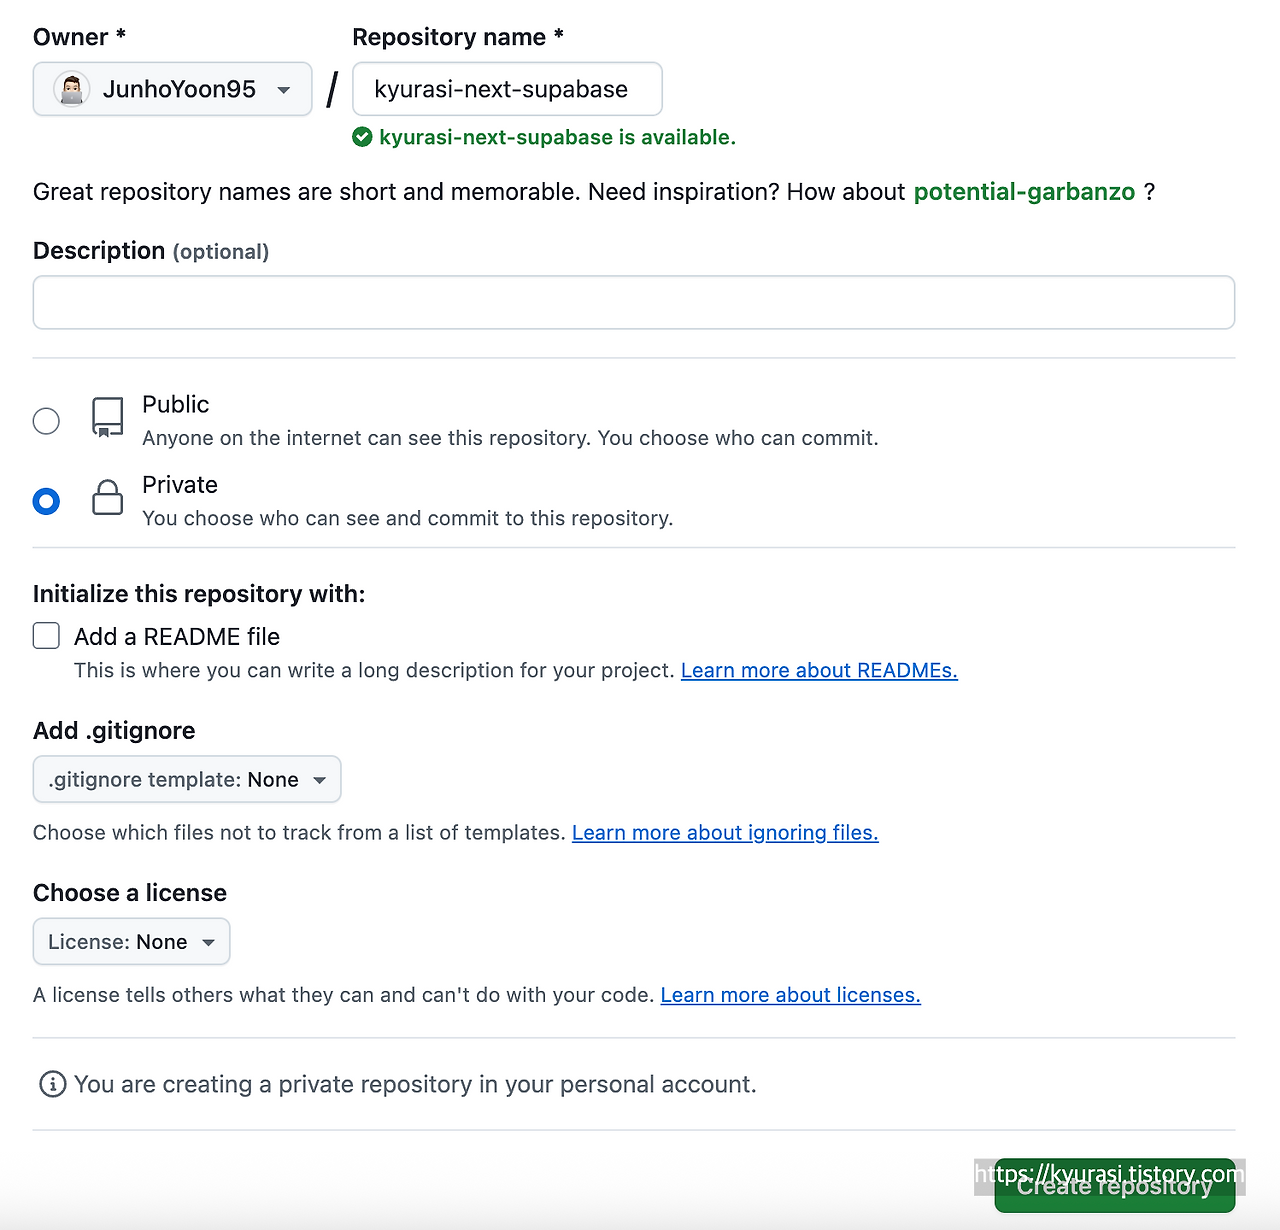
1) github 에 로그인 후 우측 상단 나의 아이콘 클릭 - Your repositories - New 를 클릭해 새로운 저장소 생성
2) 생성한 저장소의 HTTPS 주소 복사
3) 프로젝트로 돌아가서
- git init
: 현재 프로젝트의 /.git/ 안의 기존 깃 저장소를 다시 초기화
- git remote add origin [2)에서 복사한 주소]
: 현재의 프로젝트에 2) 에서 상성한 저장소를 연결
- git add .
: 모든 내용을 올릴 깃에 추가
- git commit -m "initial"
: 저는 첫 푸쉬이므로 initial 이라는 커밋을 했습니다
- git push origin main
: 올린 내용을 github 에 올립니다
2. Vercel 과 Github 연결하기
1) vercel 접속해 회원가입, new project 클릭
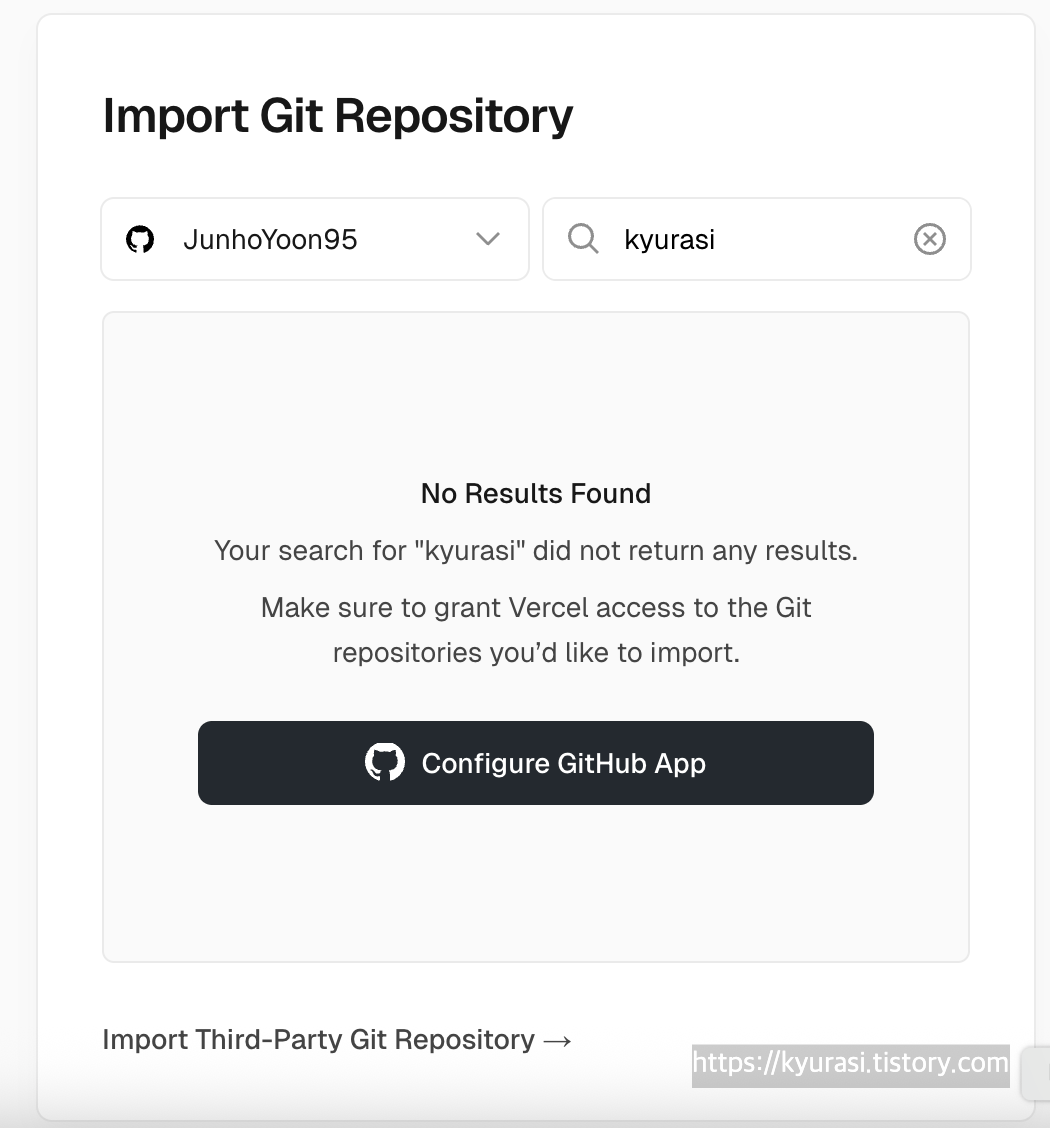
내 github 에서 방금 만들었던 저장소를 찾으려고 했는데 나오질 않죠ㅎㅎ
여기서 Configure GitHub App 을 누르시고,
Vercel 확장을 설치해주시고
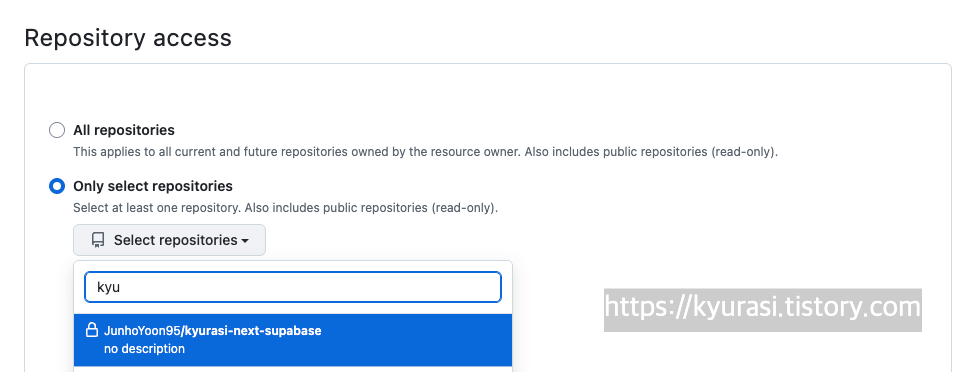
Only select repositories 를 선택하고, Select repositories 에서 방금 생성했던 저장소를 선택해 설치해줍니다
설치가 완료되면 깃허브 저장소 - Settings - 좌측 하단에서 GitHub Apps 를 클릭하면 Vercel 이 떠있어야 합니다

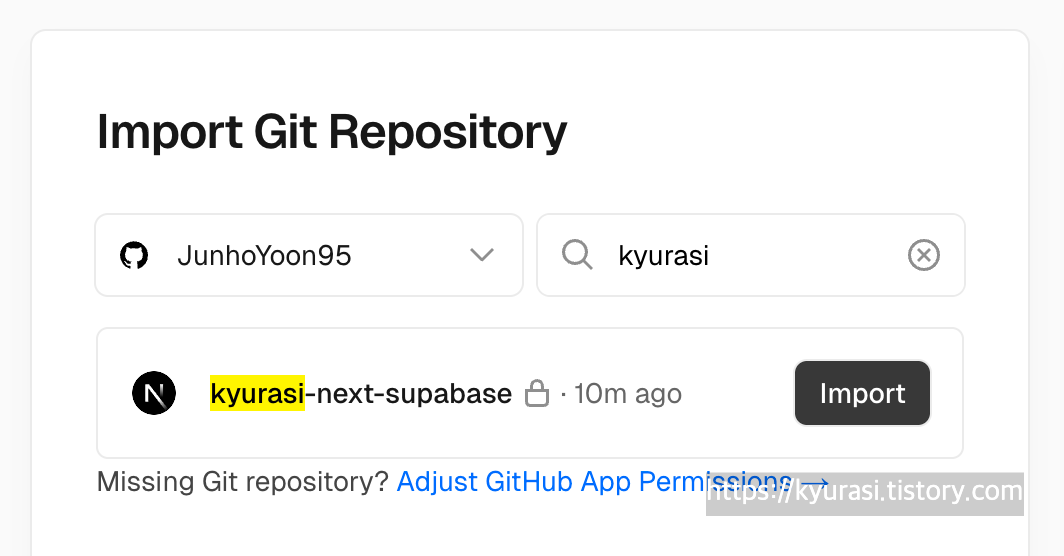
이제 깃헙에서 Vercel 확장을 설치했으니, Vercel 로 돌아가면 이 저장소가 보이게 될 것입니다
Import 를 클릭하게 되면 저는 프로젝트 이름을 헷갈릴까봐 Github 저장소 이름 그대로 했습니다.
Framework 는 Next 프로젝트로 하고 있으니 Next 로 클릭해주세요.
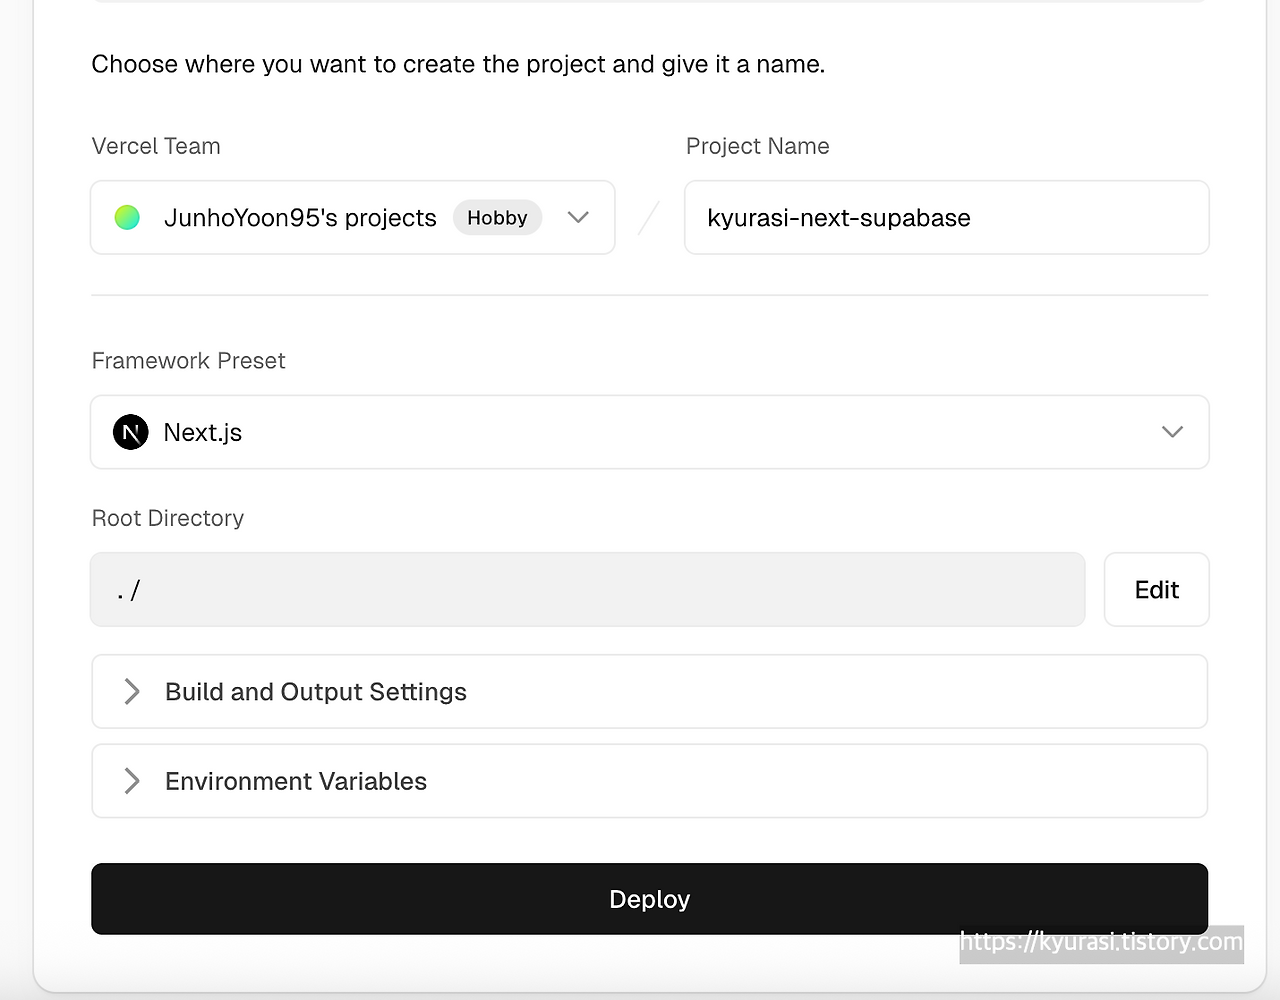
이후 Deploy 를 눌러줍니다.
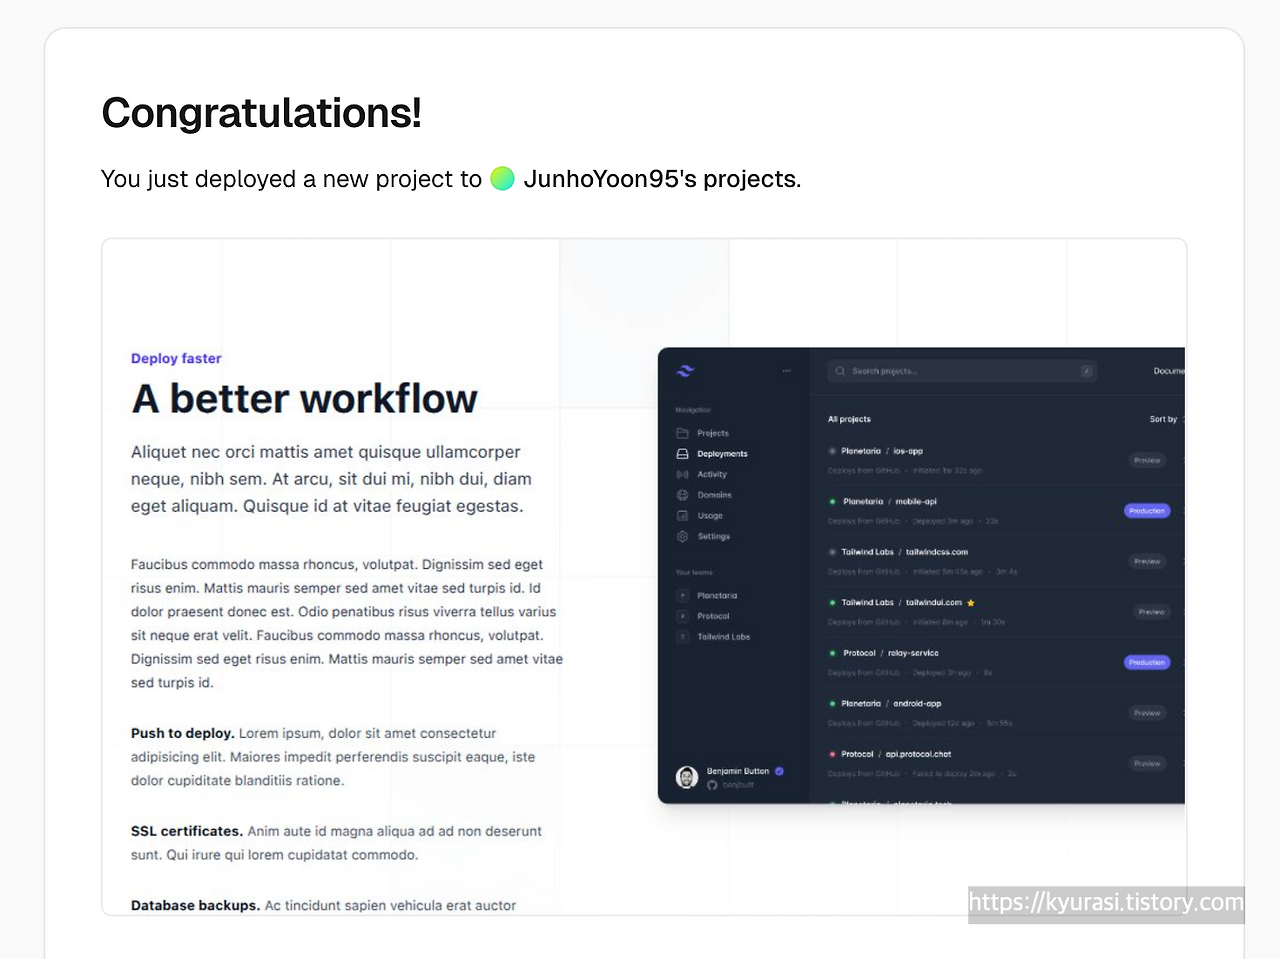
이와 같은 화면이 나온다면 Deploy가 완료 된 것입니다!
이제 Continue to dashboard 를 하시면 이 프로젝트에 대한 대시보드로 이동합니다. 이 주소는 북마크를 해두는게 좋겠습니다.

우측 상단의 Domains 를 클릭하면 현재 배포된 주소를 확인할 수 있습니다!
이제, CI/CD 가 제대로 적용이 되었는지 확인을 하기 위해 github 에 push 를 해보겠습니다
export async function generateMetadata() {
return {
title: "큐라시의 블로그 입니다",
description:
"Next.js와 Supabase를 사용하여 만든 큐라시의 블로그입니다. 최신 기술 스택을 활용하여 빠르고 효율적인 웹 애플리케이션을 제공합니다.",
openGraph: {
title: "큐라시의 블로그 입니다",
description:
"Next.js와 Supabase를 사용하여 만든 큐라시의 블로그입니다. 최신 기술 스택을 활용하여 빠르고 효율적인 웹 애플리케이션을 제공합니다.",
images: "/images/JM_logo.png",
},
};
}
const links = [
{ name: "Open roles", href: "#" },
{ name: "Internship program", href: "#" },
{ name: "Our values", href: "#" },
{ name: "Meet our leadership", href: "#" },
];
const stats = [
{ name: "Offices worldwide", value: "12" },
{ name: "Full-time colleagues", value: "300+" },
{ name: "Hours per week", value: "40" },
{ name: "Paid time off", value: "Unlimited" },
];
export default function Home() {
return (
<div className="relative isolate overflow-hidden bg-gray-900 py-24 sm:py-32">
<img
alt=""
src="https://images.unsplash.com/photo-1521737604893-d14cc237f11d?ixlib=rb-4.0.3&ixid=MnwxMjA3fDB8MHxwaG90by1wYWdlfHx8fGVufDB8fHx8&auto=format&fit=crop&crop=focalpoint&fp-y=.8&w=2830&h=1500&q=80&blend=111827&sat=-100&exp=15&blend-mode=multiply"
className="absolute inset-0 -z-10 size-full object-cover object-right md:object-center"
/>
<div
aria-hidden="true"
className="hidden sm:absolute sm:-top-10 sm:right-1/2 sm:-z-10 sm:mr-10 sm:block sm:transform-gpu sm:blur-3xl"
>
<div
style={{
clipPath:
"polygon(74.1% 44.1%, 100% 61.6%, 97.5% 26.9%, 85.5% 0.1%, 80.7% 2%, 72.5% 32.5%, 60.2% 62.4%, 52.4% 68.1%, 47.5% 58.3%, 45.2% 34.5%, 27.5% 76.7%, 0.1% 64.9%, 17.9% 100%, 27.6% 76.8%, 76.1% 97.7%, 74.1% 44.1%)",
}}
className="aspect-1097/845 w-274.25 bg-linear-to-tr from-[#ff4694] to-[#776fff] opacity-20"
/>
</div>
<div
aria-hidden="true"
className="absolute -top-52 left-1/2 -z-10 -translate-x-1/2 transform-gpu blur-3xl sm:top-[-28rem] sm:ml-16 sm:translate-x-0 sm:transform-gpu"
>
<div
style={{
clipPath:
"polygon(74.1% 44.1%, 100% 61.6%, 97.5% 26.9%, 85.5% 0.1%, 80.7% 2%, 72.5% 32.5%, 60.2% 62.4%, 52.4% 68.1%, 47.5% 58.3%, 45.2% 34.5%, 27.5% 76.7%, 0.1% 64.9%, 17.9% 100%, 27.6% 76.8%, 76.1% 97.7%, 74.1% 44.1%)",
}}
className="aspect-1097/845 w-274.25 bg-linear-to-tr from-[#ff4694] to-[#776fff] opacity-20"
/>
</div>
<div className="mx-auto max-w-7xl px-6 lg:px-8">
<div className="mx-auto max-w-2xl lg:mx-0">
<h2 className="text-5xl font-semibold tracking-tight text-white sm:text-7xl">
Kyurasi
</h2>
<p className="mt-8 text-lg font-medium text-pretty text-gray-300 sm:text-xl/8">
This is Kyurasi's blog built with Next.js and Supabase.
Leveraging the latest technology stack, it delivers a
fast and efficient web application.
</p>
</div>
<div className="mx-auto mt-10 max-w-2xl lg:mx-0 lg:max-w-none">
<div className="grid grid-cols-1 gap-x-8 gap-y-6 text-base/7 font-semibold text-white sm:grid-cols-2 md:flex lg:gap-x-10">
{links.map((link) => (
<a key={link.name} href={link.href}>
{link.name}{" "}
<span aria-hidden="true">→</span>
</a>
))}
</div>
<dl className="mt-16 grid grid-cols-1 gap-8 sm:mt-20 sm:grid-cols-2 lg:grid-cols-4">
{stats.map((stat) => (
<div
key={stat.name}
className="flex flex-col-reverse gap-1"
>
<dt className="text-base/7 text-gray-300">
{stat.name}
</dt>
<dd className="text-4xl font-semibold tracking-tight text-white">
{stat.value}
</dd>
</div>
))}
</dl>
</div>
</div>
</div>
);
}
이런 식으로 저는 UI 자체를 완전히 바꿔보았습니다. 이후에
git add .
git commit -m "ui 변경"
git push origin main
을 하고 다시 배포된 주소에 들어가서 확인해보았을 때에 잘 적용된걸 확인했습니다.
